- Warranty service
- Pre-installation work
- Manuals
and diagrams - Connection
and setup - Use
and care - Call service
- Questions
about the products - Contact a service specialist
- What is Sangens Service&Care?
- What is lifetime support about?
- What is the warranty?
- How long is the warranty period?
- What documents and materials are required to use the warranty?
- I don't have a warranty card. What do I do?
Sangens Service&Care is a team of experts who help the Customers with all their issues. We care about our users with our whole heart and always provide prompt support:
• expert advice,
• resolving warranty issues,
• supervising our technicians going to the sites to adjust or repair the equipment,
• help with installation or connection,
• providing the necessary information, including recommendations, manuals, and videos,
• analyzing the feedback to become even better.
We are ready to answer any of your questions and advise you throughout the product lifetime, even after the warranty expires.
The warranty is a free warranty service that covers the product during the entire warranty period.
In the event of a defect or incomplete product, you may contact Sangens Service&Care at sangens.com. We will solve your issue as soon as possible according to your warranty options.
Warranty obligations cease to apply upon expiration of the warranty period and in case of damage that occurs as a result of:
• failure to observe the requirements specified in the installation and operating manual;
• careless storage / use / movement of the product by the buyer;
• adding third party components to the product that do not match the technical characteristics of the product and are not approved by the manufacturer;
• modifications of the product and its control systems not provided for in the installation and operating manual and not agreed with the manufacturer (any changes without loss of warranty are possible only with the written permission of the manufacturer);
• using the product for the unintended purposes and conditions;
• intentional action;
• natural disasters, fires, floods, weather events such as rain, snow, etc.
The lifetime support is available at all times, regardless of the situation and valid warranty.
The warranty period is 5 years from the date of purchase for household use and 1 year from the date of purchase for commercial use.*
Detailed information about the warranty period and conditions are provided in the warranty card for your heater model.
* Household use implies up to 21 hours of operating time per week. If the actual operating time exceeds the specified time, such use is considered commercial.
To use the warranty, the warranty card is required containing the date of the heater purchase.
For prompt remote diagnostics, a Sangens Service&Care Manager may ask you to describe the situation and attach some photos, videos, or other materials.
If you do not have a warranty card, please notify Sangens Service&Care specifying the store and date of purchase.
- What can be done before the heater is delivered?
- How to select the right heater?
- What kind of specialist shall be engaged to install the Sangens heater?
- How to prepare for the installation of a Sangens heater?
- Is it possible to install a heater in a steam bath without grounding?
- What shall be taken into account when organizing ventilation in a steam room?
- Where shall the heater be installed in the steam room?
- Where shall the control unit be installed?
- Is it possible to install the control unit outdoors?
- Where shall the air temperature sensor be installed in the steam room?
- What happens if the temperature sensor in the steam room is installed incorrectly?
- What wires/cables come with the Series W heater?
- What wires/cables come with the Series L heater?
- What do I need to purchase to install the Series W heater?
- What do I need to purchase to install the Series L heater?
- How to extend the compensation cable supplied?
- How to extend the cable of the air temperature sensor in a steam room?
- How to select the cables/wires to connect the heater?
- How to select the automatic devices and the RCDs for connecting a heater?
- Where can I see the connection diagram?
- How to select corrugations for heater wiring?
- How can the equipment be tested before installation?
- Is it possible to connect the heater to the Internet, smart home and voice assistants (for example, Alisa or Marusya)?
- Is it possible to connect a water supply button to the heater?
- What stones shall I buy to put in the heater?
- How many stones/stainless steel do I need to purchase to put in the heater?
- Is it possible to fill a heater with turbo coils?
- I need to connect multiple heaters to a single control panel at once. How do I do it?
- I need to connect light/ventilation/fog to the Sangens control panel. How do I do it?
- I want to track the operation of the heaters in all my steam bath complexes. Is it possible to implement this?
- In what position shall the heater be transported/moved?
- В каком положении перевозить/перемещать печь?
There are a some things you can do before your heater is delivered to speed up its installation. You can do this in advance:
• Purchase the necessary cables, markings, lugs, corrugations and cable ducts, elements for the electrical panel (to be selected according to the wiring diagram).
• Prepare the mains, grounding and electrical panel. Install the circuit breakers, RCDs and necessary busbars in the electrical panel (according to the wiring diagram).
• Mark the installation locations of the elements included in your kit (heater, control unit, power unit, steam room air temperature sensor).
• Lay the wiring (without connecting) and mark the wires.
• Ensure that the site is ready for heater installation.
Ensure that the heater capacity is adequate to the volume of your steam room. Take into account the dimensions of the room, finish type, insulation, sizes of vents, modes of intended use, heat loss, and regional climate.
Glass doors, windows and all uninsulated walls increase the heater capacity requirements.
If you cannot calculate the heat loss on your own, provide information about the design to our Sales Manager, and they will help you.
The heater shall be connected by a professional who is familiar with the regulations of the regulatory authorities. • The person responsible for the heater installation and connection shall have electrical safety qualification grade III. • The person responsible for the heater installation and connection shall study the manual (soft copy can be downloaded from the official website sangens.com). • The person responsible for the heater installation and connection shall familiarize themselves with the current engineering regulations, technical regulations and rules (for example, in Russia these include: Electrical Installation Regulations (PUE), Regulations for Operation of Consumer Electrical Installations (PTEEP), Consumer Electrical Installation Safety Regulations (PTBEP), etc.)
• Check the consistency of the steam room volume to the power of the selected heater.
• Request a steam bath or sauna design from the contractor specifying the location of all equipment elements (heater, sensors, control unit, electrical panel and power unit, if provided) and wiring diagrams.
• Check the correct electrical panel contents and ensure that the necessary grounding is available. Prepare the elements for the electrical panel according to the instructions for your heater (circuit breakers, RCDs and cables).
• Prepare everything necessary for installing the heater (heater and its components, manual, tools and additional materials) at the site at the time of installation.
• Check the package contents and ensure that all elements are intact.
• Specify the date of the heater installation on the warranty card. Ensure that the heater serial number on the metal nameplate under the terminal block matches the number specified on the card. If the number is not specified on the card, specify it. If the number on the heater and the card do not match, you can proceed with the installation, however, you shall specify the correct number on the card and transfer this information to Sangens Service&Care.
• Read the heater safety notice and the manual supplied.
Grounding in a steam bath/sauna is mandatory and is required for safety reasons. In case you find any issues with grounding when installing the heater, inform the owner of the steam bath about the need to correct the situation.
For high-quality operation of the heater, it is important that the air is not directed into the heater cladding and circulates freely under it.
Recommendations for arranging ventilation are provided in the manual for the equipment.
The steam bath/sauna is designed taking into account the electrical safety requirements of the region. In accordance with the requirements, the designer determines the best location for the heater and other elements of the steam room. When installing the heater in the place specified by the designer, remember: • Air shall flow freely under the heater (the feet are moved from the transport position to the operating position, the heater is levelled) and circulate above the heater (do not hang the elements that may disrupt air circulation or reflect heat above the convection channel). • The Series W heater shall be installed so that the convection channel is located on the wall side. • The Series L heater shall be installed so that the steam nozzle is located on the wall side. • The distances between the heater and the walls of the steam room required in the manual shall be observed (see the “Safe distances” section of the manual). • The level to which the feet may be unscrewed depends on the cladding and is specified in the manual.
The control unit is installed in the room adjacent to the steam room.
• Position the control unit so that it is comfortable to use.
• In the room where the control unit is installed, the temperature shall be maintained in the range from +1 °C to +40 °C, humidity – not more than 80% (at +25 °C).
• The control unit may be built in a recess or mounted on the wall.
• When selecting a location for installing the control unit, keep in mind that the wiring to it will come from the steam room (from the heater and the temperature sensor) and from the electrical panel (as well as the power unit, where it is used). When installing a water supply button, the cable from it will also go to the control unit.
The control unit may only be installed outdoors in a special outdoor heating cabinet with the required temperature and humidity.
The location of the temperature sensor is determined by steam room zoning standards and is taken into account in the design. For proper operation of the heater, it is important that the metal tip of the sensor:
• Protrudes from the wall (approximately 15 mm).
• Does not come into contact with the wood (if this is not possible, the contact points shall be wrapped with electrical tape or a pressure seal shall be installed. The tip remains free).
• Is located at a height of 1.7–1.8 m from the floor.
• Is located as far as possible from ventilation openings (vents, windows, doors, etc.)
• Is located at least 1 m horizontally from the heater (preferably opposed to the heater).
If the temperature sensor is not installed properly and provides incorrect data, the automatic heater control system will not be able to regulate its operation correctly.
This may result in overheating or insufficient heating of the steam room and increased wear of the heating elements.
The control unit is supplied with two cables: a cable with a steam room air temperature sensor and a cable for a closed heater sensor (compensation). Each cable is 5 m long (the 15 – 18 kW control units are supplied with two 5 m compensation cables).
All other cables and wires shall be purchased according to the wiring diagram.
The Series L heater comes with all 5 m cables to connect the heater to the electrical panel. If this is not enough, similar extension cables shall be purchased.
A steam room air temperature sensor in the with a 5 m cable is also supplied.
Cables shall be purchased to lead inside the electrical panel to the line according to the wiring diagram.
For the Series W heater to operate correctly, a suitable control unit is required, as well as the materials for connection:
• Set of cables and wires. The cables and wires shall be selected correctly. The type and length shall be determined based on distances and wiring diagrams (for diagrams follow the link).
• Corrugations/protective tubes and/or cable ducts (type and length shall be determined by wiring, safety regulations and distances).
• Lugs for wiring connections (the number and types shall be selected in accordance with the wiring).
• Wire marking kit (for example, heat-resistant labels or heat-resistant tubes with a marker).
• Elements for the electrical panel: circuit breakers, RCDs (required based on the wiring diagrams – see diagrams).
• Thermal tubes or thermal insulation for the compensation cable (attached to the part of the cable that fits inside the equipment without corrugation to protect against moisture and current leakage; required for all cable types except KTSFE KhA).
• Stones for internal and external heater (the quantities and types of materials are determined by the heater model and are specified in the manual).
Materials required for connecting the heater:
• Cables for wiring inside the electrical panel. The type and length shall be determined based on distances and wiring diagrams (for diagrams follow the link).
• Cables and wires for extension in case the 5 m cable supplied is insufficient.
• Elements for the electrical panel: circuit breakers, RCDs (required based on the wiring diagrams – see diagrams).
• Corrugations/protective tubes and/or cable ducts (type and length shall be determined by wiring, safety regulations and distances).
• Wire marking kit (for example, heat-resistant labels or heat-resistant tubes with a marker).
• Stones for internal and external heater (the quantities and types of materials are determined by the heater model and are specified in the manual).
The compensation cable supplied is used to connect the closed heater sensor inside the heater. This cable shall not be spliced or extended. In case the length of the wire supplied is insufficient, the required wire length shall be purchased additionally.
We recommend using thermocouple KTSFE KhA 2*0.5 mm2 (two cores — chromel and alumel), since it already has suitable insulation, provides for a minimum interference and is the easiest to install.
PTN-KhA 2*0.5 mm2 may also be considered, but it may not be suitable for the facilities with multiple devices (smart home, generators, radio frequency installations and other equipment that can cause interference). Interference will affect the quality of the temperature data.
SFKE KhA 2*0.5 mm2, PTNG-KhA 2*0.5 mm2, TESA-KhA 2*0.5 mm2 are also permitted, however, the options for laying and connecting them to the heater will be different.
Shielded cables will require additional heat-resistant insulation (for example, heat shrink tubing). The use of heat-resistant insulation is required to prevent the compensation wire shielding from touching exposed metal parts of the heater and any grounded elements of the electrical system in the room. If these are the only cable types available, please consult Sangens Service&Care prior to installation.
The control unit for Series W or the heater itself for Series L is supplied with a sensor for measuring the air temperature inside the steam room. It is attached to a 5 m cable.
• For the Wi-Fi control unit, a temperature sensor is provided with a 2*0.5 mm2 cable with silicone insulation. It can be extended with a two-core copper cable with a cross-section from 0.5 mm2 to 1.5 mm2 by soldering (for example, 2*0.75 mm2 SPKB (GOST); KSVVng(A)-LS 2*0.5 mm2).
• For a professional control unit, a temperature sensor is provided with a 3×0.35 mm2 cable with combined insulation made of glass fiber and fluoroplastic. If necessary, it can be extended with a three-core copper cable with a cross-section from 0.35 mm2 to 0.75 mm2 (for example: MGTFE, MGTFES, MKESh, MKSh) by soldering.
• For Series L heater, a temperature sensor is provided with a 2*0.5 mm2 cable with silicone insulation. It can be extended with a two-core copper cable with a cross-section from 0.5 mm2 to 1.5 mm2 by soldering (for example, 2*0.75 mm2 SPKB (GOST); KSVVng(A)-LS 2*0.5 mm2).
Please note that the sensors and cables of the control units of regular and professional versions are different.
• Only heat-resistant wiring shall be used in the steam room. For example, RKGM or PRKS grades. Outside the high temperature and humidity area (for example, in a dressing room), ordinary cables may be used.
• The cross-section of the wires is selected taking into account the power of the heater. The recommendations for the cross-section of each wire and cable are provided in the heater wiring diagram (larger cross-sections are allowed, but not smaller. When selecting the wires of a larger cross-section, ensure that they fit comfortably into the corrugations, the control unit and the electrical panel).
The recommended circuit breakers and RCDs are specified in the wiring diagram.
The wiring diagrams are provided in the manuals. For connection diagrams follow the link or see the list below: • Wiring diagrams for Series W heaters via control units with Wi-Fi/BLUETOOTH • Wiring diagrams for Series W heaters via Sangens Pro control units (professional) • Wiring diagrams for Series L heaters.
The corrugations are required to protect the cables from humidity and mechanical stress. The steam room uses heat-resistant, non-flammable corrugations.
All wiring from the heater, except for the compensation cable, shall be placed in a metal hose with plastic insulation. The compensation cable shall be laid in a separate corrugation (the type of corrugation is selected according to the type of the compensation cable. If you use PTN KhA or KTSFE KhA type, a separate metal corrugation with plastic insulation may be used. If you use a shielded cable, it requires a plastic corrugation made of non-flammable material). Two compensation cables of W30 and W40 heaters may be laid in a single corrugation, but separately from other wires.
The diameter of the corrugations shall be selected according to the cross-section of the wiring (the cables shall be placed inside).
The protective corrugations and cable ducts outside the steam room shall be selected in accordance with your project, premises and safety requirements, including Electrical Installation Regulations (PUE).
You can check the unconnected equipment using a multimeter. To check:
• Take measurements between contacts N and U1, N and U2, N and U3. The multimeter screen shall display a number between 15.5 and 17.
• Take a measurement between contact N and ground PE. The resistance shall be equal to infinity.
• Take measurements between the thermal relay contacts (1 and 2). The multimeter shall show that the contacts are closed.
If the measurements differ from those specified, please contact Sangens Service&Care.
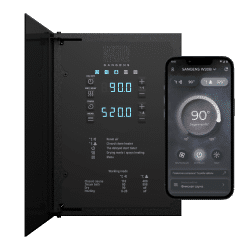
The heater may be connected to the Sangens App via the Sangens Block control unit supporting Wi-Fi, and controlled remotely using a smartphone or a tablet.
To connect the heater to a smart home and voice assistants (including Alisa or Marusya), connect third-party equipment and provide third-party programs with access to the heater. This is not recommended. Allowing third-party programs and devices to control your heater may affect your own safety and the operation mode of the heater.
Damage to the heater caused by the use of third-party equipment and software is not covered by the warranty.
If you need automation and remote dispatch at a commercial facility, we recommend connecting the heaters not to a smart home, but via Sangens control units with OwenCloud.
You can place your steam baths on a personal map and control their operation remotely from your phone, computer or tablet.
OwenCloud servers are deployed in data centers in Russia with Tier III reliability level. The program allows you to digitalize a commercial facility and control not only the heaters, but also steam generation.
Your heaters will be protected from overheating, and you will receive timely notifications about the condition of the heaters.
You can order equipment for your facility through your Sales Manager.
A water supply button may be connected to Series W heaters. To do this, connect the hot water supply hose to a special heater tube and run the wiring from the button to the control unit. To download the water supply button connection diagram follow the link.
For an internal heater, it is best to use jade or its combination with stainless steel in quantities determined by the heater model.
In case these materials are unavailable, you can use chromite or pyroxenite.
When using jade, the stones shall be relaid and renewed once a year, and when using chromite or pyroxenite — at least once every three months.
Tumbled stones of any type resistant to high temperatures and conditions in a steam room are suitable for an external heater. The number of stones is determined by the heater model and is specified in the manual.
The amount and dimensions of the stones laid are determined by the model of your heater and are specified in the manual in the table with the technical characteristics.
The table shows the fraction and maximum weight for the stones or their combination with stainless steel. The heater shall be filled entirely, leaving a gap of under 5–6 cm from the top edge in the Series W heater and 8–9 cm from the top edge in the Series L heater, without exceeding the maximum permissible load.
Stainless steel coils may only be used in combination with stones in the proportions specified in the manual. The coils shall be made of stainless steel intended for use in steam bath heaters.
In case the coils without stones are used, the load capacity shall be exceeded to fill the entire space of the heater. In case the amount of coils permissible by weight is loaded, the space of the heater will not be filled. Both options will most likely result in rapid failure of the heater.
You need an M series control panel. Depending on the modification, up to 18 heaters can be connected to it.
Tell your Sales Manager about your requirements, and they will help you select the modification.
You need an M series control panel. Certain third-party equipment may be connected to it for integrated steam room management.
Tell your Sales Manager about your requirements, and they will help you select the modification.
Yes. Depending on the number of heaters in each steam bath complex, you can connect them to equipment with Wi-Fi only or with OwenCloud cloud architecture. The second option allows for the integrated dispatching of steam bath complexes.
Tell your Sales Manager about your requirements, and they will help you select the modification.
The heater is delivered in a vertical position, mounted on a pallet in the package protecting the housing and the structure. It shall be transported and handled appropriately.
When moving, the heater shall be positioned vertically or at a slight angle (approx. 20°). Do not turn the heater upside down or completely horizontally – this can result in the heater displacement and damage to the insulators.
When removing the heater package from the pallet, carefully detach the fasteners holding it in place. Do not tear the heater off the pallet – this may damage the structure.
Печь поставляется в вертикальном положении, закрепленная на паллете в упаковке, которая обеспечивает защиту корпуса и конструкции. Перевозить и переносить ее следует в соответствующем виде.
При перемещении печь должна располагаться вертикально или под небольшим наклоном (угол около 20 градусов). Нельзя переворачивать печь вверх ногами или полностью горизонтально — это может сместить каменку и повредить изоляторы.
При снятии упаковки с печью с паллеты аккуратно открепите удерживающий ее крепеж. Не вырывайте печь с паллеты — вы повредите конструкцию.
- Where can I find instructions and diagrams for Sangens equipment?
- How can I read the instructions for installing and connecting the Sangens control unit?
- Is it possible to watch video instructions?
- Are there any step-by-step guidelines on how to mount and install Sangens heaters?
- What to do if the information in the instructions is not enough?
- Where can I find 3D models and images for modeling?
For the current instructions and diagrams for installation, connection and operation of Sangens equipment follow the link.
The instructions for installing and connecting the Sangens control unit are attached to the Sangens heater installation manual.
The following video instructions are provided on the “Sangens Russia” YouTube channel: • Connecting Sangens Series W12 & W20 heaters to the mains • Connecting a professional Sangens Block Pro W6-9 control unit • Configuring Sangens Block W6-9 and W15-18 Bluetooth • Laying stones in the closed heater of Sangens Series W12 & W20 heaters • Assembling the Glass cladding for Sangens Series W12 & W20 heaters • Assembling the Brick cladding for Sangens Series W12 & W20 heaters • Assembling the Stone cladding for Sangens Series W12 & W20 heaters The video library will be updated regularly.
This section is currently under construction.
If you have any questions, feel free to contact the Sangens Service&Care specialists be any of the following: • leave a request via this form • call 8 (800) 500-53-80 • write to service@sangens.com • send a WhatsApp or Telegram message to +7 987 021-31-31 (for warranty issues), call +7 987 041-31-31 (for technical support).
We have prepared and packaged the designs for each of the products. Design formats: • fbx – via import into your development environment. • glb – via import into your development environment. • 3dsMax – via import into your development environment. Link for downloading and importing.
- How many settings are there in Sangens equipment and how do they affect the use of the steam room?
- Where can I change the heater settings and operation mode?
- What temperature shall I set to heat the steam room?
- What temperature shall I set to heat a closed heater and how much water shall I add to generate steam?
- Where and how shall I add water to generate steam?
- How to maintain a comfortable amount of water added using a bucket or automatic supply button?
- How often shall I add water?
- What happens if you pour water into a convection channel?
- There is no steam when water is supplied to the heater. What do I do?
- There is no blizzard sound when water is supplied. What do I do?
- At what temperature of a closed heater can water be added to the heater?
- What kind of water shall I add into the heater?
- How to properly use aromatic oils in a steam room?
- The heater takes a long time to heat up and heats up the room. What do I do?
- The heater heats up too quickly and heats up the room. What do I do?
- It's cold in the steam room, although the control unit shows a high temperature. What do I do?
- The temperature sensors are not arranged according to the instructions. What do I do?
- The heater was not installed according to the instructions. What do I do?
- May the heater be installed close to a wall or other items inside the steam room?
- What are cladding care instructions?
- There are chips/scratches/damage on the heater cladding. What do I do?
- What are heater care instructions?
- What kind of maintenance does the heater require?
- How often shall the stones in a closed heater be changed?
- What happens if I use other stones or do not re-lay them as part of the maintenance?
- Unpleasant odour coming from the heater. What do I do?
- In what condition shall the heater be to perform maintenance?
- How long does it take for the heater to cool down?
- Is it possible to connect third-party equipment to Sangens control units?
- What options are available on the Sangens App?
- How is control via the Sangens App different from the dispatch via OwenCloud?
- I can't set the heater up myself. What do I do?
Sangens heaters allow for easy switching between two standard modes “Steam Bath” and “Sauna”, as well as creating individual modes by adjusting three parameters:
• Temperature inside the steam room;
• Temperature inside a closed heater (i. e. inside the heater), which determines the type and dispersion of steam when water is supplied;
• Amount of water supplied to the heater.
The user also has access to advanced settings. They depend on the heater model and the selected equipment:
• Sangens Block Series W control unit with Wi-Fi allows to control the Sangens Series W heater from the phone; switch drying or heat maintenance modes on; start and stop the heater using a timer; adjust the heater according to hysteresis; view operation analytics; add an automatic supply button and adjust the amount of the water supplied. With the Sangens Block Series W Wi-Fi control unit, you can connect to the Sangens App for remote control and status information about your heater.
• The Sangens Block M Pro control unit allows to connect up to 18 heaters per unit and additional equipment (water supply button, ventilation, light, etc.), as well as automate various processes in the steam bath/sauna for uninterrupted safe operation and remote dispatch from the phone, the tablet or the computer. Using the Sangens Block M Pro control unit, you can connect your facility heaters to the OwenCloud software and application for overall facility monitoring, control, map distribution, alerts and reporting.
The settings are set on the control unit. In case a Wi-Fi module is available, the equipment can be controlled from a phone or a tablet, and when OwenCloud modules are used it can also be controlled from a dispatch program on a computer.
To determine the comfortable temperature inside the steam room, it is recommended to start at 60 °C and gradually adjust the settings to find a suitable mode. Those liking mild conditions can steam at a temperature of 45–55 °C. For those preferring more intensive conditions, a temperature of 70–80 °C may be used.
It is not recommended to set the temperature above 90 °C for steaming (if you plan to supply water to generate steam) and in sauna mode without steaming if you are not prepared for such temperatures.
We recommend consulting a physician before using the steam bath or the sauna.
The appropriate temperature of a closed heater and the amount of water supplied to the heater are individual for each person, but often comfortable steam can be achieved by adding a small portion of water into the heater with a closed heater heated to 520–530 °C or higher temperatures. When the closed heater is well heated (above 520–530 °C), finely dispersed steam is generated, which will be comfortable, mild and light for most of the users.
To determine the steam level appropriate for you, start with small amounts of water at a closed heater temperature of 500 °C. Gradually increase the temperature of the closed heater using the control panel and add water again, slightly increasing the amount. When you determine comfortable steam, remember the amount of water, the temperatures set in the steam room and inside the closed heater.
Be careful with the steam generated as it may be scalding. Especially when the temperature inside a closed heater is below 500 °C. Attention! DO NOT supply water when the heater temperature is below 480–500 °C.
Water can be supplied using the traditional method (i. e. using a ladle to splash water on the stones of an open heater) or automatically using the automatic water supply button. In case a ladle is used, water shall be splashed in small portions onto the stones in the bowl of the open heater. DO NOT pour water onto other areas of the heater, and especially into the convection channel (a narrow opening with a grate).
The automatic water supply button is not included in the standard heater scope of supply, but the Series W equipment provides tubes and contacts for its connection. When the button is pressed, water automatically enters the heater to generate steam.
• When using a ladle, select the ladle with a comfortable volume.
• When using the automatic water supply button, set a comfortable water supply volume for this button on the W6-9/W15-18 control unit (set in seconds from 0 to 10). Select the comfortable time according to the pressure in your water supply.
First, determine the comfortable steam for a single water supply operation. Next, understand how many times this portion of water shall be added over a short period of time:
• A single water supply operation provides mild steaming conditions;
• Double water supply starts high-quality steaming conditions;
• Triple water supply produces extreme steam and is recommended for use by professionals who know how to use bath whisks in such conditions.
In case the heater is installed correctly, when water enters the convection channel, the RCD will trip and the heater will switch off. Water shall only be poured onto the stones in the outer heater. DO NOT pour water into the convection channel since it is unsafe for the user and may damage the heater.
In case the steam is not generated when water is added, check the following:
• Temperature in the closed heater before adding water to the heater again. It is recommended to supply water to the heater at a temperature of at least 480–500 °C.
• Correct laying of the stones inside a closed heater. The amount and type of the stones laid shall correspond to those recommended in the manual. Missing or incorrect stones laid can affect the steam and result in overheating of the heater. If used for a long time at these conditions, the heater may fail.
• Correct connection of the closed heater sensor.
There may be no blizzard sound for multiple reasons:
• The closed heater is not filled correctly. Correct the issues with the stones laid.
• The closed heater is not warmed up enough (temperature below 490 °C). Check the temperature and, if necessary, wait for the heater to warm-up to the required temperature.
• The steam nozzle was specially modified to eliminate the blizzard sound.
• Broken steam nozzle. Contact Sangens Service&Care
It is recommended to heat a closed heater to a temperature above 480–500°C to generate steam for two reasons:
• At low temperatures, highly dispersed steam (large drops) is formed. For many users, this steam causes discomfort when breathing and steaming.
• In an insufficiently heated heater, water may not evaporate, but stagnate.
The heater shall be supplied with clean water at a temperature of 50–60°C.
The water shall be clean, since salts and other impurities can be felt in the steam (depending on the type of additives/contaminants in the water, they can even cause physical discomfort) and will settle on the stones laid and the structure of the heater, which often results in the gradual degrading of materials.
It is recommended to use hot water, since cold water cools the stones laid and increases the time it takes to restore the temperature in a closed heater to the specified values. This affects energy consumption and the time between two water supply operations.
To release the aromas of the bath whisks and herbs, warm and moisten them in a “steam cake” by placing the herbs in cratches on the walls under the ceiling (but not above the heater) and raising the bath whisks above your head.
DO NOT place foreign items on the heater. DO NOT shake the bath whisks or herbs over the decorative bowl of an open heater or the convection channel. DO NOT pour aromatic oils or other mixtures onto the heater or the stones.
Essential oils, alcohol-containing or other flammable mixtures shall not contact the hot areas of the heater, in particular, the stones laid and the structure of the convection channel.
The average time for heating a steam room to 70 °C is 1.5 hours, for heating a closed heater to 530 °C – 2.5 hours.
The warm-up time to the specified temperatures may be longer for multiple reasons:
• Inconsistency of the heater with the steam room volume or poorly calculated heat losses (increase the power of the heater, reduce heat loss in the steam room or adjust the ventilation).
• Problem with the air temperature sensors and the internal heater (check whether the installation location of the air temperature sensor is correct and whether the two sensors are connected correctly, ensure that the polarities are correct and there is no interference).
• Incorrect filling of the inner heater (needs to be checked and filled correctly).
• Damage to the equipment from the electrical wiring, control unit, sensors or heater (contact Sangens Service&Care for diagnostics).
The average time for heating a steam room to 70 °C is 1.5 hours, for heating a closed heater to 530 °C – 2.5 hours.
The warm-up time to the specified temperatures may be longer for multiple reasons:
• The heater does not match the volume of the steam room (check the ventilation and set the lower temperature).
• Problem with the air temperature sensors and the internal heater (check whether the installation location of the air temperature sensor is correct and whether the two sensors are connected correctly, ensure that the polarities are correct and there is no interference).
• Incorrect filling of the inner heater (needs to be checked and filled correctly).
• The heater works to the max as a result of some modification (check the control panel, the sensors, the connection of third-party equipment and adjust the settings as required).
• Damage to the equipment from the electrical wiring, control unit, sensors or heater (contact Sangens Service&Care for diagnostics).
In case a similar situation occurs regularly and is not associated with a change in physical sensations (for example, due to illness), check the air temperature sensor in the steam room.
The heater convector is connected to this sensor and automatically adapts to its data. The received data may be incorrect for the following reasons:
• incorrect installation of the temperature sensor in the wall of the steam room;
• physical damage to the sensor;
• interference from other equipment or blocking of the sensor by foreign items;
• damage to wiring/equipment.
Contact your electrician or Sangens Service&Care for advice and diagnostics.
In case the temperature sensors are installed incorrectly, the heater will rely on incorrect data, which will complicate the process of setting up and operation.
For example, if you place the sensor above the convection channel, it will read the temperature from the hottest point in the steam room. In this case, the device will receive data that it is always hot in the steam room, and will not warm the room to the required temperatures (depending on the hysteresis set, the heater will often automatically turn on/off).
We strongly request you to install and connect the sensors correctly in conformity with the recommended distances and requirements for the correct operation of the heater. If inconsistencies are detected, the sensor shall be moved.
DO NOT use the heater if it is installed incorrectly (for example, it is placed with the convection channel towards the passage, the feet are not unscrewed from the transport position, the distance to the wall does not meet the requirements, the wires are not laid according to the instructions, etc.).
Contact your specialist with a request to make adjustments and Sangens Service&Care for remote diagnostics and advice on this issue.
No. The heater shall be located at a distance from other items specified in the manual. The distances depend on the heater model, its cladding and adjacent materials.
Non-aggressive glass ceramic cleaners and a suitable cloth are suitable for cleaning the glass cladding. For eco-ceramics cladding, a soft, damp cloth shall be used.
DO NOT place foreign items on the cladding. DO NOT place foreign items on the heater.
DO NOT use an heater with a tempered glass cladding if the cladding appears damaged. In this case, replace the damaged cladding element.
DO NOT use the heater with a glass cladding if the cladding is damaged. In this case, switch the heater off, wait for it to cool down and quickly remove and then replace the damaged cladding element (not the entire cladding, but the damaged element only).
Brick/Stone/Ceramic cladding may be used with minor scratches resulting from minor impacts. However, we recommend contacting Sangens Service&Care for diagnostics. Some damage can be repaired with easy-to-use repair kits.
Use the heater according to the instructions, care for the cladding, and perform maintenance according to your heater model.
The recommended maintenance includes checking the condition of the grounding circuit and the reliability of the power contacts, checking the protective grounding, inspecting the condition of the insulation and wiring, cleaning the contact surfaces and re-laying/replacing part or all the stones laid.
Routine inspections help maintain your heater operating excellently and ensure failure-free operation for many years.
When using jade or its combination with stainless steel, the stones need to be relaid and renewed once a year, and when using chromite or pyroxenite – at least once every three months.
If you use a heater in a commercial facility, the stones shall be relaid and changed more often.
The timing shall be determined by the natural rate of stone degradation.
An incorrectly selected type or amount of the stones laid can disrupt the functioning of the heater (prolonged and poor-quality heating of the room, overheating, breakdowns). Poor quality stones laid or stones crushed from overuse may damage the equipment.
The heater shall not be left empty.
Cases of equipment damage due to gross violations of operating rules are not covered by the warranty.
If you are certain that the odor is not due to water (impurities/contaminants), bath whisks or fragrances, stop using the heater, unplug it, wait until it cools down and inspect it.
Most likely, there is a foreign item in the convection channel. If nothing is found inside the convection channel, disassemble the heater and inspect the inner heater stones and wiring. Pull out the discovered item and ensure that it did not damage anything.
If there are no foreign items inside the heater, or if there are signs of damage to the device elements, contact Sangens Service&Care.
The heater shall be disconnected from the power supply.
If the heater and the inner heater stones are cold, the inspection may be performed immediately after disconnecting the device from the power supply.
If the heater and the inner heater stones are hot, wait until they cool down or use special heat-resistant gloves.
The average time for the heater and internal heater to completely cool down to room temperature is 2 days.
You can speed up the cooling of the heater by ventilating the steam room or by performing the following:
• remove the cladding;
• remove the stones from the upper funnel of the open heater and remove it;
• remove the cover of the closed heater;
• ventilate the steam room.
• A Sangens Series W heater and an automatic water supply button (including third-party manufacturers) may be connected to the Sangens Block Series W (Wi-Fi) control unit.
• Sangens Spa System equipment, Sangens Series W heaters, as well as an automatic water supply button, lighting, ventilation and other equipment item at the request of the client (including third-party manufacturers) to the Sangens Block Series M control unit.
When purchasing third-party equipment, we recommend that you first check its compatibility.
You can manage multiple heaters in the app, as well as:
• remotely monitor the equipment;
• switch the heater on and off;
• select and create your own operation modes;
• change the temperature in the steam room and in the closed heater;
• set the timer.
The app sends notifications about some errors. Through the Sangens App, you can go to the Sangens Service&Care page for advice and answers to your questions.
We regularly update the features of the app.
Sangens App is a mobile application that runs on smartphones and tablets. OwenCloud is a software that runs on a smartphone, a tablet or a computer.
You can add multiple heaters to the Sangens App and OwenCloud and control them remotely.
However, heaters shall be added one by one to the Sangens app and controlled individually. In OwenCloud, heaters are considered both individually and as an overall system. There are several adjustments available in the Sangens App, and different command options can be recorded in OwenCloud.
OwenCloud provides more opportunities for remote control, automation and tracking, so it is more often used at commercial facilities to systematize and simplify their operation. In addition, OwenCloud provides statistics that can be used for development, cost optimization, promotion and prompt service.
Contact Sangens Service&Care. A specialist will advise you on this issue and help create suitable conditions for you to enjoy your bathing experience and SPA treatments with Sangens.
This section is currently under construction. Please contact Sangens Service&Care by phone 8 (800) 500-53-80 or leave a request in the form below so that we can quickly address your issue.
- Что означает ошибка FUSE?
- Что делать, если появилась ошибка FUSE?
Ошибка FUSE на блоке управления может появляться по трем причинам:
1. Перегрев корпуса (температура выше 130°C).
2. Неисправность термореле или его контактов.
3. Неправильное подключение термореле.
Термореле находится на печи слева от клеммного модуля (контакты 1 и 2).
Если ошибка FUSE появляется сразу после запуска оборудования до его нагрева, вероятнее всего это связано с термореле и его контактами.
В таком случае рекомендуем отключить печь от электросети и выполнить следующие действия:
1. Проверьте, насколько корректно подключены контакты термореле на блоке управления и печи: все ли сделано по инструкции, плотно ли затянуты контакты? Провода от термореле на печи должны приходить строго к контактам FUSE на блоке управления. Если обнаружите некорректное подключение или слабые контакты, исправьте подключение и проверьте работу устройства. Если подключение корректно, переходите к следующему пункту.
2. С помощью мультиметра прозвоните контакты термореле на стороне блока управления и на стороне печи (оборудование должно быть отключено от электричества). Если обнаружите разрыв, свяжитесь со Службой заботы Sangens Service&Care для определения причины выхода термореле из строя. Если разрыва нет, переходите к следующему пункту.
3. Свяжитесь со Службой заботы Sangens Service&Care для получения дальнейших рекомендаций.
В случае появления ошибки FUSE через несколько минут после запуска оборудования и его нагрева, следует сделать следующее:
1. Убедитесь, что воздух циркулирует под печью в достаточном объеме. Для этого нужно проверить высоту ножек на соответствие рекомендациям из инструкции (под каждую модель облицовки). При необходимости выкрутите ножки на рекомендуемую высоту (после отключения оборудования от электросети). Проверьте, корректно ли обустроена вентиляция в помещении для свободной циркуляции воздуха.
2. Убедитесь, что мощность печи соответствует объемам помещения. Для этого засеките время прогрева помещения до 80°C (оно не должно значительно превышать 1,5 часов). Если мощности печи недостаточно для обогрева помещения, конвектор будет работать без остановки, в результате чего корпус перегреется, и появится ошибка. Работая постоянно в таком режиме, печь выйдет из строя гораздо раньше положенного срока, поэтому следует увеличить мощность оборудования или уменьшить теплопотери парной.
3. Отключите печь от электричества и проверьте, насколько корректно подключены контакты термореле на блоке управления и печи: все ли сделано по инструкции, плотно ли затянуты контакты? Провода от термореле на печи должны приходить строго к контактам FUSE на блоке управления. Если обнаружите некорректное подключение или слабые контакты, исправьте подключение и проверьте работу устройства. Если подключение корректно, переходите к следующему пункту.
4. Прозвоните термореле с помощью мультиметра (оборудование должно быть отключено от электричества). Сначала на блоке управления, затем на печи. Термореле на печи находится слева от клеммного модуля (обозначено контактами 1 и 2). Чтобы добраться до термореле, снимите облицовку с правой боковой стенки, где установлен клеммный блок. Если мультиметр показывает, что обрыва нет, переходите к следующему пункту.
5. Вытащите термореле из печи (нужно выкрутить винты, на которые оно закреплено) и посмотрите характеристики на обратной стороне. Здесь должна быть указана температура 130°C. Если значение отличается, свяжитесь со Службой заботы Sangens Service&Care.
Если никакое из указанных действий не помогло, свяжитесь со Службой заботы Sangens Service&Care для получения дальнейших рекомендаций.
